first off, I HATE ipod socks and cell phone socks and find them pointless to knit/crochet or buy. (I do, however, regularly get teased for using a real sock for my camera... it's convenient and very un-bulky when placed in a purse).
SO, I got a new cell phone and free case and realized that even though the cell phone cover was manufacture made for the phone and and very nice leather, it had some things that I hate. First, it had a belt clip. I honestly don't know of a chick that uses a belt clip. Second, it didn't cover the entire keypad. Have you ever seen the oil and gunk that comes off your face and cakes on cell phone covers as you cradle it on your shoulder? yuck. it's worse if there is makeup involved. So I definitely wanted full keypad protection. I couldn't find any templates, suggestions, or even the hint that this has been done before (though I'm sure it has) so i decided to fake knowing what I was doing try.
Stich 'n' Bitch: The Happy Hooker had a pattern for an ipod cover with a plastic screen protector (another thing i haven't seen online) so I decided to take that idea and roll with it.
What follows is a general idea of how to craft something for your cell phone (they're all different, a real pattern probably wouldn't help anyways) and what worked for me.
NEEDED
- medium-small crochet hook (I used F, it was the smallest I had at the time. Just got a D, I might attempt another with that)
- yarn, preferably cotton or a cotton blend (I used Lion Brand Cotton Ease which is 50/50 cotton acrylic)
- tapestry needle
- thin plastic (no idea where my mom got this, but it works great)
- paper/pencil/scissors (to make a pattern for the plastic)
- nail or awl (to punch holes in the plastic)
- hammer
- snaps or velcro or buttons. basically, some sort of detachable attacher to join the two pieces when they are on the device (i used Dritz Gripper Brand Snap Fasteners for thinner fabrics, size 15 (10mm). They're pretty old- my mom's kind of a packrat of sewing stuff- and something for a thicker fabric probably would have been more appropriate, but it works.) Velcro would work, so would buttons. I was just mimicking what the leather ones have.
FIRST
paper, pencil, scissors, and the cell phone. figure out where you seen to be able to see the actual phone and not yarn: that means the keypad, display screen, and if you have a front display, that too. Your phone does not made to close with yarn in it, so the template needs to account for that and be cut slightly bigger than the actual dimensions. This allows for the holes to be punched along the edge and the yarn attached about where it closes. Draw (trace if you can) on paper, cut it out and see where it needs to be smaller/bigger.

SECOND
awl or nail, hammer. When you're satisfied with the paper cut-out, trace/cut it out in plastic. I highly suggest paperclips to keep the two together. Clear plastic is hard to see. Also, I suggest drawing a border on the paper where you want the holes to go and using the paperclips to keep it all together while you punch. Oh, and think about where you want to punch. try making a swatch of your crocheting and seeing how far apart the holes would need to be. closer is better, particularly on the corners, BUT not too close because you don't want them running together or getting too close to the edge. I suggestion extra plastic for practice. No holes in the bottom of the display and top of the keypad piece! no yarn will be there!!
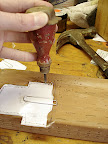
THIRD
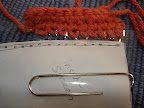
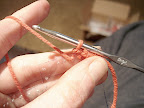
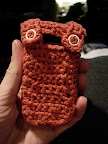
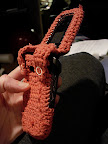
yarn time. Now, cast on to the plastic. I started with the front cover piece because it seemed easiest. Of the 3 pieces, it was. I cut off a piece of yarn about 3x the size of the area I was casting around and used a tapestry needle to poke it through each hole because my hook wouldn't fit. For some reason I couldn't figure out how to do this with the same yarn i was crocheting with.... see the picture. When I was just short of the edge of the cover, I bound off. Then, I cast on to the plastic display piece and used the tail to bind it to the front display piece. Keep the cell phone handy and try it on a lot. I had to take a row off. The goal is snug.

FOUR
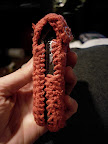
more yarn. This time the keypad piece. I cast on one row and then decided to go across the row instead of trying to figure out how to do some sort of circle. I know it's probably possible, but this way seemed simpler. I also did not join it at the bottom so as to leave room for my charger without taking off the entire cover. Then I wove things in (which I hate doing) and took pictures.
FIFTH
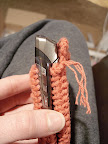
the flaps. They kind of look like overalls to me. tiny, pink overalls. They are simply a rows of four sc. I like the placement of them because they protect my corners. I drop my phone. a lot. In fact, I have what one might call butterfingers. anyways, a few rows of those, leave room so that you can put a snap backing in the bottom piece and snap piece on the flap. Ok, this might seem sort of silly... but you can't crochet these two pieces together. I'm sorry, it would look a lot cleaner, but if you join the two pieces, you'll never get the thing off your cell phone without destroying it. not cool. Your battery (and in my case, also my sd card slot is under the battery cover next to the battery) is there and if you need to clean it or something, you want to be able to remove it. Oh, if you plan on buttons, now would be the time to make button holes
SIX
the detachable attachers. Velro or buttons or snaps... all good. my snaps had directions with them involving placing the pokey thing in the back piece and poking it through the fabric and hammering in the male or female part, then matching where that is on the flap, placing the pokey thing and hammering the corresponding part.

Done. :-)


