Tuesday, December 20, 2011

Christmas Stockings

I am still alive and working (yay! I got a part time job!) and making and baking things, but lately it's all been Christmas presents.  I would love to post those, but some of the people receiving them read this blog... so that's out til after Christmas. 

I did make my husband and I stockings. This project has been in the works for a long time- I got the faux fur from my mom's stash specifically to make these in June! Nearly a yard of red linen blend was found in remnants in September after the local college's sororities had used most of the bolt in the name of school spirit.

Yes, this is instagramed.  I have horrible lighting in my house.

It just took me til last week to do anything with the materials.

First up, I had to have a pattern for the stocking shape. If you own a stocking, you can just trace it and add about 1/4-1/2" all around for your seam allowance.  Since this is our first Christmas, we have very few decorations and the stockings we grew up with have stayed with our parents: hence the need for me to make some. A quick google image search turned several shapes you can download, trace, enlarge, whatever. The stocking won't fit anyone anyway, so as long as you're happy with it, it's fine. If it doesn't include the size of fur strip you'll need, then you'll need to make your own pattern piece. First, how thick of a cuff do you want?  Copy/trace that amount of inches from the top of the stocking onto another piece of paper, marking which end is the toe and heel end.  Fold the fur in half and place the toe end of your pattern piece against the fold, then cut (you'll get one long strip instead of two pieces. You could also do it with two pieces, but I did it with one).

The red stocking part is incredibly simple.  I serged my pieces because the fabric would fray like crazy otherwise.  The cuff was the hard part.  

Faux fur is incredibly weird to work with. It sheds more than my dog and that's saying something. Most tips I found suggested small cuts using scissors or craft knifes on the wrong side of the fur and not to cut through the fur itself. But how does one finish off a cut end? I couldn't find a tutorial, so I modified a technique I found to make a vintage faux fur collar. She has great pictures that explain each step.  

I cut one faux fur strip and one same sized lining (I suggest white cotton, but I'm not entirely sure a liner is even needed for a stocking.  However, the faux fur collar used one, so I did too). Tack the lining to the faux fur using an uneven, shallow basting stitch that just catches the fur backing (I basted on one and didn't on the other.  I highly suggest basting). Sew twill/hem tape to the edge of the right side of the fur using a zig zag stitch.  I had silver hem tape in my stash and didn't feel like purchasing white.  Festive!  And cheap!  Cut off any excess cuz this is going to get thick.

machine zig zag stitch to the edges of the fur.


Fold the binding tape over on one side so that the faux fur edge is contained and use a running stitch to tack it to the lining. The other end will be attached to the stocking proper.

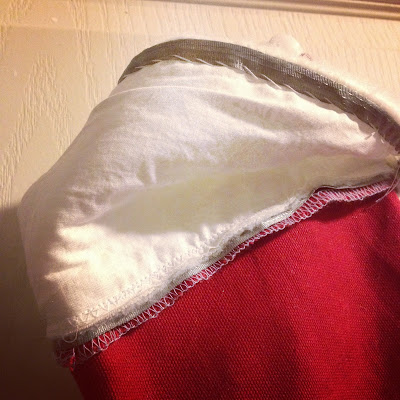
Pin the right side of the fur to the WRONG side of the stocking (i.e. turn the stocking inside out) with the tape folded towards the top of the stocking. The zig zag stitch on the right side of the fur should be hidden by the tape folding over itself.  This is hard to see in the pictures, but the second one below this paragraph shows it slightly better than the first one.  After I pinned it together, I stitched the  fur together for that back seam in the first photo (taking care not to get any red stocking in the seam).  I feel like there was probably a better point/time to do that step, but I'm not really sure what it is since I knew that my paper pattern wasn't very exact. I straight stitched the fur to the stocking using the bottom of the zig zag as a guide.

RIGHT side of fur pinned to inside-out stocking with fur seamed

Hard to see, but I stitched a straight stitch using the bottom of the zig zag as my guide

Then I turned the stocking right side out and folded the faux fur cuff over. You can make a simple tube out of the red material about 1.5" wide and 6" long and stitch it to the stocking so you can hang it. My tube is still inside out because I found the fabric too thick to turn right side out without a super cool tool made for turning tubes right side out. 

Yay, all done!

There. All done. Now we have our very own stockings.

Tuesday, November 22, 2011

Twine Keeper

I think I'm back. Due to the unfinished nature of my rental house (not enough insulation, doors fitting improperly, lack of heat) and a couple of nights hovering around freezing, I had to take a break.  My husband and I were huddling in the central room of the house around a space heater.

I finally joined pinterest and while my first week or so of using it was slightly frustrating (I could not get anything to be posted and viewable on any of the 3 browsers or 2 platforms I tried), I've somewhat started to appreciate it.  Instead of googling a craft I want to make, I can search for it on pinterest and then repin it so I can come back to it later.  That's how I'm using it at least.

 I discovered this easy craft of turning a glass jar with metal lid into a kitchen twin holder via a craft blog I follow.  Things like this justify my obsessive saving of jars for Future Unspecified Use. It's super simple to do, keeps your twine clean while cooking, and prevents it from rolling off the counter onto the floor.

this project's spiciness?  medium.

I found that a glass salsa jar was the best shape for my kitchen twine instead of the example of a glass peanut butter jar (I have a lot of those).  I had a tiny bit of difficulty making the hole for the grommet round.  I'm thankful the eyelet is wide enough that it covered pretty much all of the ugliness on this top! I used a hammer to dull down any sharp bits I had before setting the eyelet.

it looks great in the kitchen
I'm thinking about using this same principle to turn giant plastic peanut butter jars (think Costco sized Adam's Peanut Butter) into a yarn keeper.  I keep a project by the couch so when I'm watching tv I can feel a bit productive, but it's getting unwieldy and I dislike the thought that my dog's hair is getting mixed in with the fibers.  One of my former roommates and I went through a lot of Costco sized peanut butter jars but I'm not sure that I kept any of them.... maybe a post on craigslist will turn up something.

Friday, November 11, 2011

too cold to craft

It's too cold in the crafting room to craft.  I'll be back when my house has heat and/or my landlord finally does some basic cold weather proofing (like replacing doors with cracks I can stick my finger through.)

Tuesday, November 8, 2011

Chicken with Tomatillos and Braised Fruit

I haven't posted in a week. Between my temporary job ending (yay!) and my husband's laptop batter/charger fritzing out (boo!), I have been busy cleaning all the little things I neglected while working and sharing my computer so he can do Important Law Studying.

I did make something amazing last week though.

We eat a lot of Mexican food, and usually it's prepared more or less the same way- rice, beans, some sauteed veggies, and chicken spiced with cumin and peppers and topped with cheese. The base of rice and beans is cheap, filling, and healthy, and by shredding the chicken we stretch it out longer for days longer than eating a breast each for dinner. As much as I like it, I was getting tired of it. Epicurious.com is my go-to website for finding new recipes when I'm not sure exactly what I want to fix, but I now I want something different (and Cooks Illustrated is my go-to when I know exactly what I want). My parents gave me and my husband early Christmas presents of iPhones and I've been using the epicurious app a LOT in the kitchen- I don't have to print out any recipes I find and I can double check the ingredient list in the grocery store.

I found a Chicken with Tomatillo Sauce and Braised Fruit recipe that is AMAZING and unlike any other Mexican dish I have prepared at home.  By using a few substitutions, I had nearly everything on hand.  The only "special ingredients" I had to buy were pears and tomatillos. I substituted dried cranberries for dried cherries, ground cinnamon for the stick, ignored the epazote leaves and green onions per the comments, and completely forgot to buy tomatillos.  I was really disappointed in myself for forgetting the tomatillos, but I discovered that in some recipes, green tomatoes and a bit of lime can be substituted for tomatillos.  Since my tomato plants decided to produce some late harvest tomatoes that would never have time to ripen before the first frost, I went out and gathered up all the remaining tomatoes I could find.  From what I understand, green tomatoes have a similar tartness to the tomatillos (but not a crispness) and don't cook down like ripe tomatoes. This recipe definitely tastes like fall/winter goodness because of the pear, but it was published in a June 2007 magazine - possibly because that's when tomatillos are in season.

I'm salivating just seeing this picture
It took me about two hours to prepare this recipe (which included the using my awesome cleaver to quarter the chicken).  I ended up throwing some chicken stock in the pot at some point because I didn't feel like the chicken was cooking fast enough and it seemed to need more liquid (I think there's a difference in water content of tomatillos and green tomatoes).  I think I added a bit less than a cup, use your judgement if you need it. We made rice and black beans to accompany this (the rice soaks up the extra liquid).  

ingredients
  • 1 (3-pound) chicken, quartered
  • 2 tablespoons vegetable oil
  • 1 large onion, halved, thinly sliced crosswise
  • 4 large garlic cloves, chopped
  • 2 tablespoons minced chipotle chiles (from canned chipotles in adobo)* (or a cayenne pepper)
  • 2 pounds tomatillos, husked, rinsed, quartered (or green tomatoes cut into bite size pieces)
  • 1 cinnamon stick (or a generous helping of ground cinnamon)
  • 1 pound pears, peeled, cored, cut into 1/2-inch cubes
  • 4 ounces dried apricots (about 2/3 cup)
  • 3 ounces dried cherries or cranberries (about 1/2 cup packed)
  • Warm tortillas
preperation
Brine the chicken for at least twenty minutes.

Heat oil in a heavy large pot over medium-high heat. Add chicken pieces and cook until browned, about 5 minutes per side. Transfer chicken to plate.  At this point, I took off the majority of the skin to reduce the fat content in the recipe. 

Add onion to pot; sautĂ© 2 minutes. Add garlic and chipotles; stir 1 minute. Stir in tomatillos and cinnamon stick; return chicken pieces to pot. 

Reduce heat to low; cover and simmer until chicken is cooked through, stirring occasionally, about 35 minutes.  I shredded the chicken after it was cooked.

Add pears, apricots, and cherries and simmer until pears are tender, stirring occasionally, about 15 minutes. Serve with warm tortillas, rice, and beans.

Saturday, October 29, 2011

Puppy Dog the Ladybug

I made my dog a Halloween costume.

First off, I would like to affirm my belief that dogs should not wear clothing.  They have fur.  Unless you have a grayhound who has been bred to have no body fat/hair and therefore has a legitimate reason to wear a sweater, you should not put your dog in a sweater.  I have two exceptions to this and both are conditional.  I find dog raincoats practical in rainy climates, not because they look cute, but because the first thing my dog does after being out in the rain is shake all over the front entryway. The raincoat seems like it would be a practical convenience (I don't own one).  The second is dog booties in icey weather. In general, I think a dog's paws are made for the elements and we shouldn't mess with the natural calluses. However, deicing salt is dangerous for a dog. It can cause chemical burns on their paws from prolonged contact (long walks or iceballs on the foot hair) and can be toxic if the dog licks their paws (to get rid of iceballs, etc).

That said, costumes are not clothing.  A costume has no practical purpose and I do not intend for it to serve any purpose other than being adorable.  And Puppy Dog is adorable.

I spent maybe $3 on this costume for the red felt, which I actually bought to make Christmas ornaments.  The entire costume is made of felt and stuck together with felt glue.  I rough measured her to cut out a rectangle of felt and then cut out a bit for her neck and rounded the back end.  I discovered a wine bottle made appropriate sized black circles.  Some of my felt scraps and velcro were used to hold it on it on to her body at the waist and neck.  I did not make any sort of hat because those tend to bother dogs. 

sad eyes
 Ok, so she's not thrilled with the costume. I had the velcro on there pretty loose so she shook it off in about 10 minutes.  That's ok.  I spent $3 on it and I wasn't expecting her to wear it for long. 

the largest bug I've seen in our house.  some have come close though.


[edit] I intended to post this on Thursday, but after taking Puppy Dog to the vet, I was in no shape to add the last minute touches, take pictures, and write something up. On Thursday, we found out three pieces of bad news regarding our dog, Puppy Dog.

First, she has an ear infection.  I was expecting that one.  She's been using her paws to scratch her ears/nose in the most adorable way, but she seemed in pain. We got a prescription for some meds that will easily clear it up.

Second, she's in heat. We had believed she was spayed, so this was a big surprise.  Dogs should ideally be spayed before their first heat. She has at least a 25% chance of developing mammary tumors because she's had several heats (probably in the neighborhood of 16) and the anesthesia is more dangerous for older dogs.  Again, easily taken care of, but the surgery will be somewhat traumatic for her 9 year old body and it's an extra expense for something we thought was done.

Third, she tested positive for heartworms. This one is WAY, WAY more serious than the other two issues.  Heartworms are a potentially fatal condition and if left untreated, they can cause problems in the heart and lungs.  We have two options to deal with it. One, the slow-kill method: give her heartworm prevention medication so she doesn't contract more heartworms or spread heartworms and wait for the ones in her to die.  This could take several years.  This is not an accepted treatment, but it does work for some otherwise healthy dogs and is recommended for those that cannot withstand the treatment.  Two, the fast-kill method: give her the treatment, which is a long and expensive process.  After being evaluated to make sure she would survive treatment, she would be given injections of an adulticide in the muscle (ouch!) over a period of several months.  For both of these options, the real danger lies in the adults heartworms dying.  As they die and decompose, they can cause partial or complete blockage of blood flow to the lungs.  For the fast kill method, she has to be kept on the doggie equivalent of bedrest because all the worms are killed at about the same time.  For the slow kill, the more active she is, the greater the risk.

We decided to go with the slow kill method. Even if we had the money for the fast kill method, it wouldn't necessarily be worth the expense due to her age.  As she is relatively healthy, she seems to be a good candidate for the slow kill method.  However, she could basically drop dead from a dead worm blocking her blood flow and that terrifies me- and because it's a very slow process, I expect to be terrified for several years while I wait for them to die.

So after all this, I realize I made her the wrong costume.  Heartworms look like spaghetti and since they are in her heart, clearly she is a Pastafarian and member of the Cult of the Flying Spaghetti Monster.

However, I started this costume before I knew any of this.

Tuesday, October 25, 2011

Carroty Macaroni and Cheese

I love boxed macaroni and cheese.  It was the first dish I ever learned to make completely by myself (second was tuna noodle casserole).  My husband does not share my love for boxed mac and cheese.  He loves macaroni and cheese casserole.  It's a bit of a sensitive subject for us.  Before we got married, we had half-joking discussions regarding which version of mac and cheese our future children will eat more and likely love more (jury is still out).  Since we've been married, it hasn't been as big of an issue.  We've made mac and cheese casserole, but I always keep a box on hand for those days we both get home late, I have no idea what to make for dinner, there's no meat defrosted, and if I don't get something on the table now he's going to order pizza.

When I was fully FUNemployed, it wasn't too hard to get dinner on the table every night without much planning.  Now that I haven't slightly less time on my hands, it's been a bit hit and miss.* Last weekend, Jamie and I planned out this weeks meals.  First up was something I was rather excited about and he was kind of dreading: his beloved mac and cheese mixed with some like-colored vegetables.

The carrots kind of look like cheese.
Result?  Well, he said he couldn't taste the carrots and had seconds, so I'm going to count that as a win.

I made a few alterations, but here's the recipe I used with my alterations (1/4 tsp less mustard powder, used buttermilk instead of sour cream, and I'm not sure I put in as much carrot as called for either.  And after reading over the ingredients again, I totally forgot to put butter in... wow.  Couldn't tell.)

Carroty Mac and Cheese
  • 2 cups macaroni
  • 2 1/2 cups coarsely grated carrot (about 8 small)
  • 2 1/2 cups grated sharp cheddar cheese and 1/2 cup gouda
  • 1/4 cup (1/2 stick) unsalted butter, cut into pieces
  • 3/4 cup buttermilk (I used powdered, so I always have it on hand)
  • 1/4 cup whole milk
  • 2 large eggs
  • 1 teaspoon salt
  • 1/2 teaspoon mustard powder
  • 1/4 teaspoon freshly ground black pepper
  • 1/4 cup finely grated parmesan cheese
1. Preheat oven to 400°F and grease an 8-inch square baking pan. Arrange a rack in the top third of the oven.
2. Cook macaroni according to package instructions in a large pot of salted boiling water; add carrot 3 minutes before pasta is finished cooking; drain well.
3. While pasta is hot, stir in all but 1/2 cup of the cheddar and the butter. In a bowl, whisk together the buttermilk, milk, eggs, salt, mustard powder, and pepper. Fold mixture into the pasta.
4. Scrape the mixture into the prepared pan. Sprinkle the remaining cheddar and the parmesan over the top. Bake until the casserole is firm to the touch and golden brown, about 30 minutes. 

* I would like to clarify that I don't cook our meals because I'm the wife and he expects me to.  My husband is a fine cook and often cooks on the weekends.  However, I am done with my education at this point and he is continuing his for the benefit of both of us. I consider his studying every night a bit more important than evenly dividing cooking nights.  The 1L year is hard enough without me stressing him out more. 

Tuesday, October 18, 2011

Sweet Potato Zucchini Bread

[editor's note: I just got an iPhone and I would like to assure those using smartphones that this site looks good in the mobile version. So you know... if you want to visit me more.  Or look up ingredients for recipes. Also, I have discovered that those of you who have liked me on facebook aren't always seeing my new posts pop up in your feed. I believe if you like a couple things on the page or add comments, facebook will "learn" that you like hearing from me and notify you more often. Now, on to the actual post.]


Sweet potatoes were on sale last week and my husband and I got excited because of all the great things that can be made with sweet potatoes- sweet potato pie, sweet potato mashed potatoes, baked sweet potatoes, baked sweet potatoes with brown sugar and marshmallows, etc, etc.  Jamie claimed some of the sweet potatoes for a pie and I got the rest to portion out for dinners and this new recipe I found. 

Sweet Potato and Zucchini Bread

Usually I link to where I got recipes and patterns to avoid copyright infringement and give full credit to the original author/publisher.  For this recipe, I took the main idea from an Epicurious recipe and combined it with elements from the zucchini bread recipe in The New Best Recipe Cookbook (hereafter shortened to NBRC).

Whenever I use a recipe off Epicurious, I always check the comments to see how people have changed the recipe.  Usually people have decreased the fat/sugar or suggested adding another spice to really bump up the flavor.  This one was no different.  Most people did some combination of all purpose and whole wheat flour, decreased the sugar, and replaced some of the fat with applesauce.  I also combined whole wheat and all purpose flour, decreased the sugar to NBRC levels, and fully intended to replace some of the oil/butter with the last bit of my applesauce... but I opened the jar and was nearly overpowered by the scent of fermented apples.  So I just cut down on some of the fat [edit: it needed that extra 2 tbs. I put it back in the recipe.]

NBRC has some great ideas regarding zucchini bread.  Zucchini, like tomatoes, cucumber, and melons, has a high water content.  Macerating the zucchini in sugar allows it to release it's juices, just like people do with strawberries they want to enjoy on waffles.  Instead of grating the zucchini, I ended up grinding it.  I do not have a box grater appropriate for this (my microplane grates too finely) and my faithful food processor's 30 year-old bowl finally broke (it's been in the process of breaking since a roommate was particularly harsh with it).  So I had a food grinder.  I don't really recommend using it unless the veggies are softer, but it definitely works in a pinch. 

Grinding the zucchini up.  I find most things, once ground, look slightly disgusting.
I've noticed that NBRC tends to add sour cream, plain yogurt, or buttermilk to their quick bread recipes (muffins, sweet breads, etc) because it is an acidic liquid that brightens flavors.  In this one, they preferred yogurt.  I did not have any on hand so I went with their second choice: buttermilk. 

So, I've only had a small slice of this so far, but here are my impressions.  It has a mild sweetness with a subtle flavor of both zucchini and sweet potato.  I think the sweet potato is kind of like the carrot in carrot cake: it lends the sweetness and backbone of a root vegetable, but isn't so intense you can't taste the other flavors.  I think using some allspice and nutmeg would help round out the flavor- just cinnamon is too one dimensional.  Overall, I'm pleased with it.  It's a bread you probably wouldn't bring to a potluck or make for company, but it is the kind you would buy at a coffeeshop.  It's filling and as far as coffeeshop treats go, it's one of your healthier options.  It's actually exactly what I was going for: something healthy-ish my husband could eat with coffee instead of buying something from the coffeeshop. 

not my best photo.  it was not a bright and shiny day. 
Sweet Potato Zucchini Bread

1c. all purpose flour
1c. whole wheat flour
1tsp cinnamon (or 1tsp cinnamon, 1/2 tsp allspice, 1/4 tsp nutmeg)
1tsp baking soda
1tsp baking powder
1/4 tsp salt

3/4c. sugar
2 eggs
6tbs (3/4 stick) butter, melted and cooled (or replace up to half with applesauce)
1/4c. plain yogurt or buttermilk (or 1 tbs dry buttermilk added to dry ingredients and 1/4 c. water added to wet)
1tsp vanilla extract

1 1/2c. grated zucchini (+ 2tbs sugar)
1 1/2c. peeled, grated sweet potato

1/2c - 1c. chopped walnuts, toasted (opt)

1. grate zucchini and toss with 2tbs sugar.  Put grated zucchini in a strainer over something to catch the juices.  It should drain for about 30minutes or however at least as long as it takes to prepare the rest of the ingredients and heat up the oven.
2. preheat oven to 350 and prepare bread pan or muffin tin
3. mix dry ingredients.
4. grate sweet potato and add wet ingredients to it and mix.  Add the zucchini.  Add the walnuts.
5.  bake for 55min - 1hr 15min at 350degrees.

Thursday, October 13, 2011

Weekend Hand Warmers

I'm not very good about finishing big knitting projects.  I've been working on a cranberry colored market tote made up of mitered squares for about three years.  Some projects are just hard for me to stick with, so I was super proud of myself for making these hand warmers. 

They're a tiny bit fuzzy cuz I've been wearing them for a year

Especially since to get the shaping right, I ended making a total of FOUR hand warmers.  Yup, I have two sitting with my yarn waiting to be frogged (rrrrrrriiiiiip it out).

Want some tips if you want to make your own?  (or just to see more pretty pictures??)

Saturday, October 8, 2011

Pot Scrubbies and Plarn

After I switched to using Alternasponges, I needed something scratchy.  I'm a big fan of alternative materials like plarn.  Plarn is "yarn" made out of plastic grocery bags and you can make some cool baskets and purses with them like this.  I've played around with making crocheted bags and purses out of plarn, but due to how chunky plarn is and the size of hook that needs to be used, I haven't made much else.

I had just finished a bag of clementines, so I decided to see what I could make out of the nylon stretchy bag. I ended up making a great little scrubby that has served me well for months now.  Have you ever tried to clean up dough with the scratchy side of a sponge?  It doesn't come out.  This scrubby rinsed out after using it a few more times.  We primarily use cast iron and generally one doesn't use soap or sponges that might have soap in them because it breaks down the oil that seasons it.  This scrubby doesn't hold soap like cotton or sponges and is great with cast iron. 

the original scrubby
So I decided to make another one. 

This one didn't turn out so well.   Why?  Well...

Tuesday, October 4, 2011

Living Frugally

I think I've mentioned that I'm currently FUNemployed*.  It has a HUGE effect on what I can do here because I need my money to buy food, not grommets and bias tape.  I've set rules for myself that were somewhat unconscious until I wrote this post.  So here they are. 

1.) No buying things.  Unless I find a fabric in the remnant pile (50% off retail price!) and I really need it for a specific project (i.e. I bought some terry cloth for some commissioned wetjet pads).  Exceptions made for notions.  I can fudge what kind of fabric I'm using, but if I've explored every other option (stashed zipper in the correct length, buttons, etc) and I need velcro, then I need velcro.

2.) Check the thrift/seconds stores first if I do need to buy something and I keep my eyes open at garage sales.  This worked better when I lived with my parents and could go to Scrap ($0.10 zippers!) and The Knitt'n Kitten ($0.50 knitting needles!) or Wise Buys ($3 iron! $0.25 yarn!) and a couple antique stores in college.  Heck, my mom found my amazing serger at a garage sale around home (thanks, Mom!).  Here, it's much rarer to find someone who has donated every zipper they owned to charity.  The section of fabric lengths that usually sit next the hanging linens at Goodwill is much smaller.  The finds are fewer and farther between.  I've enjoyed thrifting for over 10 years now and I have some advice on finding things on the cheap.
a.) Every thrift place has at least one specialty.  Some always have a great selection of picture frames and furniture but hardly any craft things.  Some have the best selection of shorts, but very few housewares.  Check out every thrift store in your area and try to categorize them (probably will take a few visits).  This way, when you're in a bind and you really need X, you can know what place is likeliest to have it.

b.) Flat sheets are really just giant lengths of fabric (if you can find ones that aren't threadbare).  Instead of buying new muslin, make mockups out of old sheets.  We recently got a couch off craigslist so I'm on the look out for a set of king non-threadbare sheets or curtains to use in a color that doesn't disgust me. Curtains are good when you need much thicker or much thinner fabric. Here's a guide to sheet yardage I got here.
  • Crib Flat Sheet: 42″72″. This equals two yards of 42″-wide fabric.
  • Twin Flat Sheet: 66″x96″. This equals a smidge over two and two-third yards of 66″-wide fabric.
  • Twin Extra Long Flat Sheet: 66″x102″. This equals a little over two and three-quarter yards of 66″-wide fabric.
  • Full or Double Flat Sheet: 81″x96″. This equals, lengthwise, a smidge over two and two-third yards of 81″ fabric. The fabric is wide enough, however, that you can turn it the other way if the print works sideways. Widthwise, the fabric equals 2.25 yards of 96″-wide fabric.
  • Queen Flat Sheet: 90″x102″. This equals a little over two and three-quarter yards of 90″-wide fabric. Used sideways, widthwise, the fabric equals 2.5 yards of 102″-wide fabric.
  • King Flat Sheet: 108″x102″. This fabric is longest when turned sideways. Widthwise, the fabric equals three yards of 102″-wide fabric. Used lengthwise, the fabric equals a little over two and three-quarter yards of 108″-wide fabric.
  • California King Flat Sheet: 102″x110″. This equals a smidge over three yards of 102″-wide fabric. Widthwise, the fabric equals a little over two and three-quarter yards of 110″-wide fabric.
c.) Don't buy it unless I have a project in mind.  This applies to nearly ANYTHING found at a good deal, anywhere.  Now, there are some things particular to what I do that maybe I can/should stock pile (for months I was finding xacto knife blades at Tuesday Morning and I stocked up because I went through them like candy as a design major) but that doesn't mean I buy everything that interests you if it's on sale.  I tend to see things that only cost $1 as not being that big of a deal to buy... since I recognize that in myself, I don't let myself buy (hardly) anything from the dollar bins at the front of Target and in the checkout aisle of Joann's (hmm, I'm guessing they realized other people think like me) and thus don't buy a lot of super cheap things I super didn't need. 

d.) Go through your own stash.  Chances are, you probably have something that will work.  I happen to have a stash of fabric right now so I don't really need to buy any. I've seen some advice for those who end up with overflowing stashes of yarn, scrapbooking, sewing supplies, and clothes: if you haven't used it in a year, toss it.  You probably won't use it.  I feel like this applies to the hardcore crafters who consistently use their stashes.  Most people I know only sew a couple times a year or knit/crochet a few scarves, but they shouldn't get rid of all their needles and stuff.  I think more useful advice for the occasional crafter who finds that life takes up more of their time than crafting is to have a predefined storage space for your crafts and then stick to it.  Maybe it's a wardrobe, a set of shelves, a closet, or even a small room with cabinets, whatever is appropriate to your craft/house-size/average stash/frequency of crafting.  If your stuff doesn't fit, then you have a problem.  The answer is not another set of shelves, it's going through what you have and slimming down your craft diet.

e.) You get what you pay for.  I just bought some sheets and pillowcases at a thrift store.  It cost less than $5.  If I had bought them new, the sheets alone would have cost around $50.  Even at a closeouts/seconds store, it still would have been in the neighborhood of $30.  My thrift store sheets don't match each other and one has a hole I patched, but I'm ok with that.  The amount I saved more than makes up for that small detail at this point in my life. 

f.) Lower your expectations.  While it's not incredibly rare to find things new in box, don't count on it.  Things will generally be used, it's more a question of how used/damaged are they.  Also, raise your expectations: just because it's cheap doesn't mean it's what you want/need.  Factor in how much it might cost to repair the item in the sale price.

3.)  Crafts must have a purpose (especially if I want to spend money on it.)  I tend to give practical gifts and make practical things.  There are some things that should not be knit (I'm looking at you, human hair doily).  I think amigurumi is adorable and I really want to make all of these, but I'm not going to buy all the colors of yarn I need to do so.  If I happen to already own some Tardis blue yarn, found a free pattern, and have several hours, I might make a dishcloth of a Tardis that has no practical purpose- but it's outweighed by the alternasponges and other practical cleaning supplies I needed and made.

4.) Use coupons.  If you know you're going to be working on a project and you know everything you need, start buying your supplies a month or two before you need them and make use of every 40% coupon you can find.  Joann's, Michael's, Craft Warehouse, Fabric Depot, whatever is in your area or stocks what you need probably has coupons that you can get in the newspaper or pick up in-store (I do the latter as we don't get a paper).  However, if you don't have a project in mind, don't wait to use them for something "more expensive." I've wasted so many coupons that way.  Pay attention to what types of things have regular sales.  I know that Joann's has a sale at least once a year where patterns are $1-$3 (next week in fact!).  The notions wall is often 50% off.  Their fabric rotates what type is on sale for 40%-50% off about every week.  So, if you can, just wait a week and check the ads. 


*technically, I have a very short term contract job at the moment and it has prevented me from making anything for today's post.  Thus no pretty pictures. 

Thursday, September 29, 2011

Knitted Tardis

Is it nerdy to knit a relief of Doctor Who's Tardis?

Maybe.

I'm ok with that.

The tardis!

Tuesday, September 27, 2011

Cow Heart Meatballs with Pasta

When my husband suggested it, I thought it was weird.  When I told my brother, he made fun of us.  When I told my mom, she wondered about the nutritional value.  See, Jamie found cow heart next to the ground beef in the grocery store and really wanted it because he'd never had it and it's a cheap cut of meat.  I agreed when he said it was mostly for Puppy Dog and we would just try it.  Well, it's mostly been ours, but our dog goes CRAZY when we cook it.

 cow heart meatballs with pepper, oregano, and basil (raw)

Saturday, September 24, 2011

Bread Bag

Since I started making bread more often, I've discovered that it smells wonderful, tastes better, and I have no place to put it.  It doesn't really fit in a gallon ziploc.  I've reuse store-bought bread bags, but after a couple times of using them, I'm afraid things might grow in it.  My host family in Germany had a nice wooden bread box, but those aren't as common here.  Some plastic food storage containers that might work, but is that the best way?  I took to the internets to find a solution.
does this make my bread look fake?

Thursday, September 22, 2011

reusable duster

I'm a fan of Swiffer products.  The original Swiffer was genius: not a broom, not a mop, but somewhere in between.  I'm also a fan of the disposable aspect.  Not because I like spending money on something to throw away, but because reusing things like old fashioned mops are disgusting (old school mops? How much of that dirt/disgustingness doesn't go out with the wash water?).  Last month I made a reusable Wet Jet pad; today I made a reusable Swiffer duster that I can toss in the laundry basket with it. 
blues!  dustin' for clues...

Tuesday, September 20, 2011

Lemon-Anise Biscotti

Well, the muffins I made the other week were a bust.  Not because they didn't taste good (they tasted fine), but because I made them on a Thursday before a long weekend.  Apparently, any snack-like baking I do must be on a Sunday to ensure that they get munched on during the week during school instead of languishing on the counter waiting for mid-morning munchies between classes.   

So on Sunday I made biscotti.

lemon-y.  biscotti-y. 

Friday, September 16, 2011

Leashes and Leash Bags

it's really difficult to simultaneously hold a leash, take a picture, and get a dogs attention.

I hate to run.  Absolutely hate it.  It hurts my knees and I don't like how it works my body.  Walking?  Love it.  I would rather walk five miles than run one mile.  My husband says I "Yankee walk" because my normal walk is so much faster than his Southern stroll (after trying to walk in the Southern summer though, I've started to understand that).  When I'm walking for exercise though, it's even quicker than my normal "Yankee walk."  When I was in jr. high, I would get up at 5:30am to work out before school.  I have no idea where that motivation came from; these days I barely have the willpower to get up at 8am to go walking (keep in mind, I am jobless so getting up at 8am on a daily basis IS early for someone that has very little to do all day).

Tuesday, September 13, 2011

Gehäkelter Topflappen

Growing up, we had these pot holders.  They were obviously homemade and probably by one of my grandmothers.  They were out of place in our pot holder drawer.  Our other pot holders were fabric sets (small, medium, large!), holiday themed (nothing says Christmas like Santa holding the green beans!), or some classy, modern looking woven blue braid wound into a pot holder (think classy Amish).  These were crocheted in 70's/80's bold colors, crazy thick, and I've never been sure if I really liked them or really disliked them.  Also, they confused the heck out of me.

these are not the ones I grew up with.  image from ravelry user mettetation

Saturday, September 10, 2011

Pizza! Pizza!

Last weekend was my husband's birthday.  I had a particular craft in mind to make and post about: fabric pennant banners.  It would be his present, keep me busy on Friday, and provide Monday's post.

This did not happen.


Wednesday, September 7, 2011

My New Serger

Meet my new baby.

unnamed new serger.  then again, my sewing machine isn't named either.

She and I haven't really gotten acquainted yet (just got her yesterday in the mail from my mom) but here's what I do know:

1.) she's a serger (wikipedia link there because some people, like my husband, have no idea what a serger is), Janome My Lock 234D to be precise
2.) she originally was bought or fixed or something requiring a claim ticket from Montevilla Sewing Center (which happens to be where my sewing machine comes from, yay!)
3.) she was purchased c.1996 and is pink/purple (a decidedly mid '90s hue)
4.) she comes with accessories (different needle plate, tweezers, nets, oil, needle threader, needs... stuff like that)
5.) her little suitcase/carrier is the most adorable sewing carrying case I've ever seen

I do not yet know exactly what I'm going do with her (besides experiment and take over the world) but I'm crazy excited to find out.

most adorable carrying case ever

accessories!  instructions!  claim ticket!

gratuitous top down shot 

Friday, September 2, 2011

Poppy Seed Muffins and Beautiful Bread

Costco poppyseed muffins are one of my favorite muffins ever.  They're really big though.  And homemade muffins tend to be a tiny bit too small.  Is there a perfect muffin tin out there??

Anyway, I made poppyseed muffins cuz my husband said he was getting munchy between classes and wanted something so he wouldn't buy food on campus. 
Poppy seed Muffins

Wednesday, August 31, 2011

Applique Apron

I like wearing aprons.  Partially because I'm a klutz and spill things on myself and partially because I forget to take them off for hours after I'm done baking or cooking.

I've been wanting to make another apron since I finished my $5 dress.  I wanted to use my extra fabric that I cut off to make the waistband and pockets and use some brown and cream striped fabric for the rest.  It was a match that could either look really good or really bad, so I decided to check my other scraps to see if I had something that matched a bit better and ended up changing my mind about how I was going to make the apron.

I compared a couple different apron patterns I have and really liked the fullness and length of D, but wasn't too wild about the rick rack or faux needlepoint part of it (the center one was my second choice but the lace makes it and I don't have enough of it or the right color).
It looks like a picnic with rick rack

Monday, August 29, 2011

Clothespin Holder

We line dry our clothing.  This is not because we're eco-conscious, trying to save money, or have clothes that need to be line dried.  In fact, we bought a dryer within two days of moving into our new house.  Unfortunately it was broken the first time we went to use it.* 

So now we line dry.  I'm mostly ok with it because I've been line drying my most of my shirts for years, but it's annoying for some loads.  Sheets, because they're gigantic and take up all the room on the line- plus, when one only has one set of sheets, it's frustrating when the sheet dries in one day, but the mattress pad takes two.  Underthings, because it's a load of many small things and if someone in the house has neglected to inform the primary laundry washer that they are low of a certain item until they have none left... well, it usually needs to be dried yesterday, not in 8 hours.  And who wants to wait days for their jeans and hoodies to dry?

I've been using the broken dryer as a shelf for clothes pins and towels, but I really wanted a clothespin holder to make it easier to pin things up.  Eventually I want two (one for each side of the line), but I haven't decided what type or pattern I want.  A sewn one?  Quilted?  It'd be a good project to expend some sewing skills with (applique?), but I don't have a clear idea of what I want to do yet.  Anyone have ideas?  I've been air drying most of my shirts for years, but it's been on a folding rack that doesn't need clothespins. 

I came across this idea using a milk jug and it'll be good for now.

milk jug clothespin holder

This has nothing to do with crafting, baking or anything like that, but it made me proud.  Puppy Dog's found a toy that she likes! She was rustling around the study then came out with this in her mouth and started chewing. While I applaud her desire to chew, why couldn't it be on the kong, tennis ball, or stuffed duck we bought her??  I had to take it away because I doubt it'd be safe for her once it cracked and I don't want her to think that all my reusable containers are fair game. 
First toy that she likes!


*We bought it at the REstore, which sells used and surplus building materials and is run by Habitat for Humanity.  Normally, I highly recommend this store for all sorts of odds and ends for small projects.  It did work at the REstore and it did work when it was hooked up by the plumber/electrician.  A few weeks later, after a hellish experience trying to buy a washer from searsoutlet.com, we finally got a washer from Home Depot.  We washed our first load and threw it in the dryer, discovering that it no longer turned on. We still have no idea why.

Saturday, August 27, 2011

More Alterna-sponges and Bread Failures

I found this link last week and it simultaneously makes me laugh and think its silly... and want to make one.  Apparently the UK has a chicken rescue organization and they often get hens without enough feathers... so they're asking knitters to make them sweaters.  Sweaters.  For chickens.
hen jumpers


Two updates on the alterna-sponge project (I've made about six now).  My mom read my post and was confused at what I meant by crocheting in the round. Here's a post of what knitting in the round does on this particular piece: two layers!  If it wasn't joined at the bottom, it could make a sleeve or a coffee cozy.  For this purpose, it's closed at the bottom and the last row closes it up at the top. 
round and round the crocheting goes!

When I was researching knitted/crocheted sponges, I saw a suggestion to put some bits or ends of soaps in a pouch like this and then you have a washcloth that is pre-soaped.  I wasn't a fan of that, but I did like the idea of putting half a sponge in it to add a bit of bulk.  I chose a green scrubber because a.) it's cheap, b.) half of it fits inside these just about perfectly, and c.) it doesn't hold on to water like the cotton so I don't have to worry about having a sponge that will never dry out (though it does take a while for these guys to dry).

alterna-sponge!
Oh and I checked: washing it with the sponge inside is fine.


So I haven't been posting about baking as much on this blog, but not necessarily because I'm not doing it.  Jamie and I have been baking bread out of his book Bread Alone lately because it really is cheaper than buying bread (it just takes a lot of time).  We have a starter and it's actually doing better than the starter we had in San Francisco.  Who knew?!  I think that while San Francisco has much better free yeast in the air (thus the amazing-ness of Boudin Bakery and true San Francisco sourdough), his house was always really cold and our starter was never at the right temperature to really be good.  I made the bread this past week and I basically made long hockey pucks. We've been having trouble with this particular recipe clearly the sides of the bowl as we mix it (in the kitchen aid because my arms are weak) so I kept putting flour in... bad idea.  According to pretty much all baking books ever, it was a good idea to add flour, but I added too much. I think that my problem was that the mixer was at least 1 speed too slow.  So no pictures of that.  Two slices, which are about the size of one biscotti, will just about fill me up for lunch.  It's bad. 

when husbands cook...
I am using my swiffer wetjet a lot though!

Tuesday, August 23, 2011

Reusable Sandwich Wrap

I made a sandwich every morning for ten years. At least. My mom (wisely) had my brother and I making our own lunches for school more or less as soon as we could wield the peanut butter knife without hurting ourselves. As a result, I can pack a lunch in 5 minutes flat while brushing my teeth and packing a school bag (ok, not quite). Every morning of the ten years I made a sandwich, I used a paper towel to set the bread on (because our counter was clean and I didn't want to get it crummy) and a sandwich bag to carry to to school in. If the paper towel hadn't gotten jam on it, it might double as a napkin for the day. When I studied abroad in Germany in college, a fellow student was packed a sandwich by his host father in wax paper. Fascinating. This was the first time I had not seen a sandwich not wrapped in either a.) a plastic bag or b.) plastic wrap. What else were people using for their sandwiches?

Several years later, the resuable bag movement became more mainstream and I found out. Reusable sandwich bags that ranged from simple bags that mimic-ed a Ziploc bag with cotton and velcro to those that could double as a placemats.

How much trash had I produced in ten years?

I wanted one of these resuable bags, but I had fabric, a sewing machine, and not much money so I didn't want to pay for one. I researched (read: looked a pictures on the internet) and began to think about what style would suite me best. I quickly realized I didn't really like the Ziploc mimics. They seemed like they would get crumbs in the rough side of the velcro and that's no fun. I also liked the idea of a placemat because then I could get rid of the paper towel in the morning and also not get crumbs on my desk. So a placemat. Here's the first one I made about December or January (Just because I didn't post on here for a year doesn't mean I wasn't making stuff)
I like it. I also refer to it as my sandwich diaper. It was essentially a mock up and I had plans to make at least one more. I finally did and you can see it on my etsy shop. My husband recently started law school and when I got up in the morning I would find a plate with crumbs, a jam encrusted knife on the breakfast table, and one fewer ziploc bags in my drawer. Since my husband had already laughed at my sandwich diaper and the apples weren't exactly mansculine, I decided to try one more time at making a reusable sandwich wrap. I realized I don't have much fabric of the appropriate weight and content that is masculine, but I found some nylon my mom bequeathed me and some thin denim from a backpack my mom and I had started when I was 10 (it's still unfinished). Here is the result.
How I made these
1.) Pattern fabric
2.) Trial and error

What I used
1.) cotton (cuz it's plentiful)
2.) nylon for the lining (so I can wipe off the jam that always spills out when I cut my sandwiches in half)  

Why I like these
1.) Isn't that what this whole post is about?
2.) They can be thrown in the wash whenever they need a deep cleaning.  The nylon liner makes it easy to wipe jam spills off without having to wash the entire thing daily, but it can be thrown in with a load of wash.

Friday, August 19, 2011

Alterna-sponge

I need more sponges. My husband and I have been looking at our budget lately and are looking to decrease our cost of disposable things like sponges. I was thinking I could make the standard swatch-sized washcloth for us to use, but I wasn't excited about it. One of my grandmas made a few basic knitted washclothes for us many years ago and a couple years later, they were faded and stretched out. I'm assuming some regular acrylic yarn was used for those (I haven't touched them in years), so I knew if I made some, I would use my cotton yarn for it's durability and ability to snap back to its original size after washing (well, mostly. Everyone has those cotton shirts that stretched out). I knew I wanted something with a bit of substance (not stretchy like garter stitch or even a stockinette)

Then I did a quick google/etsy search for knit/crochet sponges and I found these. Amazing. Pretty much as soon as I found the pattern, I sat down and made it. Didn't take long and I can't wait to actually use it! It's a bit like an alternative sponge- it's nice a thick because it is knitted in the round and so double thick. Just what I wanted.


KNITTED SPONGE

I also found another one that I wanted to try as well. I'm mostly done with it, but I'm considering frogging the whole thing to make another one of the alterna-sponges. It's a great knit and I love the treble instead of double crochet to give it bit more prominent nubbins, but I've gotten used to sponges. This is just too thin for my purpose: washing dishes. I want something a bit more substantial.

Wednesday, August 17, 2011

A Dog's Bed

Dog Bed
I've put off doing laundry for a few days because my dog needs a new dog bed cover. I need to wash the one that's on hers, but until about an hour ago, it would have meant taking away her dog bed for two days (we don't have a dryer). Today I finally made one. Basically, it's a pillow cover. My original idea was to do more of a European Pillow sham closure by altering this pattern, but it basically became exactly what the pattern describes how to do. With buttons.


A word about the fabric: the pictures don't accurately convey how incredibly glow-in-the-dark pink that is. I got it in an awesome pile from my mom (which also contained the terry cloth for the wetjet reusable pads). I don't blame my mom for having this fabric, but I do blame the early 90's for making it. There used to be another double sided fabric that was black and a nice cerulean blue that became many, many, many canvas style bags (I think some were made for a church thing) that I liked. This fabric? I don't think it was touched because I have a LOT of it. Since it's home decorating fabric (60"), I don't just have yardage, I have width. So why did I decide to use it? It's sturdy and able to handle a dog's nails, licking (yes, my dog licks her bed), flopping, and being on a hard floor that has the potential to grind rocks and dirt into the bed.

I would like to say that I utilized the unique nature of this fabric by putting the contrasting pink on the bottom.... but I didn't. In fact, when I showed my husband the fabric, I told him I was only going to use the navy side. I pinned it wrong. By the time I realized this, I'd sewn two sides and decided to just go with it. Ironically, I had been thinking throughout "oh, remember when I pinned that dress backwards and I had to rip out a bunch of stitches? That sucked."

On a plus side, I got more experience with button holes. They aren't particularly hard, but it's always good to have more experience with what side of the buttonhole your machine starts the stitching, etc before doing it on something like a shirt. The buttons I used were leftovers from my wedding. When I worked at Cherish* in San Francisco, my fellow designer Stacy had an awesome idea for a flower garland to put in our store window. We used the die cutting machine to cut out many, many, many white flowers, sewed a button center, and put it up on a ribbon. Two months later, I made it for my wedding.

IMG_1829

The buttons didn't quite fit in my buttonhole foot (too thick, tiny bit too wide), so I did a test of the largest buttonhole I could make with the foot to see if it would fit. Luckily, it did! It's a tiny bit tight, but since it won't be opened and closed a lot unless I'm cleaning, it's absolutely fine. The button also didn't fit in the button foot, so I handsewed those.

* I no longer work for Cherish or live in San Francisco, but if you are interested, they do rent out studio time where you can use their die cutting machine and make these yourself. Fabrix, a discount fabric shop, is next door and where we got all the buttons- they have a bin full of amazing buttons to dig through.

Friday, August 12, 2011

etsy!

I have stuff on etsy now! I'm slowly adding to it, but I currently have up left over flowers I made for my wedding. I think my next goal is to make some earrings to have more items in the store while I plan out what books I want to make for it. I have little app to the left that shows off a few items and has a link to the full store.

Spread the word! Favorite me! Add me to your circle!

Tuesday, August 2, 2011

Reusable Wet Jet Pad

I grew up handwashing floors. When we had linoleum floors, we had mops (and they're probably still out in the garage), but by the time my mom started putting me to work washing the floors occasionally, we had wood floors and were using a spray bottle with wood floor cleaner and scrubbing on our hands and knees with rags. After a few years of carpeted dorms, I got an apartment that had hardwood, linoleum and tile everywhere but the bedrooms. The space was too tight to effectively use a traditional mop and Wet Jets were new on the market. I got one and loved it. We had just enough floor space that I could use 2 pads for the entire house.

Fast forward several years later. I'm married and living in a house with all concrete floors. It's trendy, loft-like, and great in this hot Southern weather, but the dust and dirt piles up FAST. We finally got a door mat to pick up some of the dirt, but still I have to sweep every other day (if not every day). Then we got a dog. Ideally we (mostly I) wanted a short haired dog that wouldn't shed too much. Nope, our lovely Puppy Dog (we didn't name her!) is an "average" shedder of her lovely black coat. And since we didn't have a dog bed at first, she claimed the door mat as "her" space when she didn't want to flop at our feet on the concrete.

My Wet Jet just doesn't cut it anymore.

First problem: I fill up a pad within about half a room. Second problem: these pads are expensive. Third problem: I was making sweet tea and spilled it all over the kitchen while transferring it to a milk jug. My Wet Jet barely touched the sticky mess.

What I Wanted:
Clearly I needed something that was more reusable (washable?), wouldn't cost much ($0??), and would actually scrub deeper than a a disposable cloth. Solution? Last time I was home, my mom and I went through her fabric collection and I inherited a bunch of awesome fabric. One of the pieces was about 2yds of cream terry cloth. Terry cloth is great, but just not thick enough. When I got married and we got a bigger bed, all my twin bedding became, well, useless. We used some of my mattress pads as moving pads/protectors for the larger items and I haven't been sure what to do with them now. Bingo.

What I Did:
I searched online and there are some etsy artists and others that sell reusable pads that I looked at them for inspiration, but pretty much all of them use velcro to attach the pad to the unit. I didn't have any velcro in my supplies and I have an older model with a scrubber on one side I wanted to use (new ones have them in the front). I used the terry cloth for the actual cleaning side and the mattress pad part to add some padding/stability to it. After I sewed the pieces together, I noticed the crisscross pattern on the bedding and decided to stitch along that through both pieces to add stability and decoration. I added the elastic last. It wasn't REALLY needed, but I thought it'd be good to have

Update: I just used my new washable pad and it's awesome. Since my floors are in need of a serious scrubbing, I rinsed the cloth out a bunch in the middle of mopping so it could pick up more dirt. I did noticed that I put the wrong side of the bedding out; the velcro tears it up far more that it would on the other side. After rinsing it out several times, I also discovered it works great as a cleaning mitt. It's not hard to get back on to the Wet Jet, but I was rinsing it a lot and it just seemed easier. Future moppings should be much easier though. :-)