Showing posts with label crochet. Show all posts

Saturday, October 8, 2011

Pot Scrubbies and Plarn

After I switched to using Alternasponges, I needed something scratchy.  I'm a big fan of alternative materials like plarn.  Plarn is "yarn" made out of plastic grocery bags and you can make some cool baskets and purses with them like this.  I've played around with making crocheted bags and purses out of plarn, but due to how chunky plarn is and the size of hook that needs to be used, I haven't made much else.

I had just finished a bag of clementines, so I decided to see what I could make out of the nylon stretchy bag. I ended up making a great little scrubby that has served me well for months now.  Have you ever tried to clean up dough with the scratchy side of a sponge?  It doesn't come out.  This scrubby rinsed out after using it a few more times.  We primarily use cast iron and generally one doesn't use soap or sponges that might have soap in them because it breaks down the oil that seasons it.  This scrubby doesn't hold soap like cotton or sponges and is great with cast iron. 

the original scrubby
So I decided to make another one. 

This one didn't turn out so well.   Why?  Well...

Tuesday, October 4, 2011

Living Frugally

I think I've mentioned that I'm currently FUNemployed*.  It has a HUGE effect on what I can do here because I need my money to buy food, not grommets and bias tape.  I've set rules for myself that were somewhat unconscious until I wrote this post.  So here they are. 

1.) No buying things.  Unless I find a fabric in the remnant pile (50% off retail price!) and I really need it for a specific project (i.e. I bought some terry cloth for some commissioned wetjet pads).  Exceptions made for notions.  I can fudge what kind of fabric I'm using, but if I've explored every other option (stashed zipper in the correct length, buttons, etc) and I need velcro, then I need velcro.

2.) Check the thrift/seconds stores first if I do need to buy something and I keep my eyes open at garage sales.  This worked better when I lived with my parents and could go to Scrap ($0.10 zippers!) and The Knitt'n Kitten ($0.50 knitting needles!) or Wise Buys ($3 iron! $0.25 yarn!) and a couple antique stores in college.  Heck, my mom found my amazing serger at a garage sale around home (thanks, Mom!).  Here, it's much rarer to find someone who has donated every zipper they owned to charity.  The section of fabric lengths that usually sit next the hanging linens at Goodwill is much smaller.  The finds are fewer and farther between.  I've enjoyed thrifting for over 10 years now and I have some advice on finding things on the cheap.
a.) Every thrift place has at least one specialty.  Some always have a great selection of picture frames and furniture but hardly any craft things.  Some have the best selection of shorts, but very few housewares.  Check out every thrift store in your area and try to categorize them (probably will take a few visits).  This way, when you're in a bind and you really need X, you can know what place is likeliest to have it.

b.) Flat sheets are really just giant lengths of fabric (if you can find ones that aren't threadbare).  Instead of buying new muslin, make mockups out of old sheets.  We recently got a couch off craigslist so I'm on the look out for a set of king non-threadbare sheets or curtains to use in a color that doesn't disgust me. Curtains are good when you need much thicker or much thinner fabric. Here's a guide to sheet yardage I got here.
  • Crib Flat Sheet: 42″72″. This equals two yards of 42″-wide fabric.
  • Twin Flat Sheet: 66″x96″. This equals a smidge over two and two-third yards of 66″-wide fabric.
  • Twin Extra Long Flat Sheet: 66″x102″. This equals a little over two and three-quarter yards of 66″-wide fabric.
  • Full or Double Flat Sheet: 81″x96″. This equals, lengthwise, a smidge over two and two-third yards of 81″ fabric. The fabric is wide enough, however, that you can turn it the other way if the print works sideways. Widthwise, the fabric equals 2.25 yards of 96″-wide fabric.
  • Queen Flat Sheet: 90″x102″. This equals a little over two and three-quarter yards of 90″-wide fabric. Used sideways, widthwise, the fabric equals 2.5 yards of 102″-wide fabric.
  • King Flat Sheet: 108″x102″. This fabric is longest when turned sideways. Widthwise, the fabric equals three yards of 102″-wide fabric. Used lengthwise, the fabric equals a little over two and three-quarter yards of 108″-wide fabric.
  • California King Flat Sheet: 102″x110″. This equals a smidge over three yards of 102″-wide fabric. Widthwise, the fabric equals a little over two and three-quarter yards of 110″-wide fabric.
c.) Don't buy it unless I have a project in mind.  This applies to nearly ANYTHING found at a good deal, anywhere.  Now, there are some things particular to what I do that maybe I can/should stock pile (for months I was finding xacto knife blades at Tuesday Morning and I stocked up because I went through them like candy as a design major) but that doesn't mean I buy everything that interests you if it's on sale.  I tend to see things that only cost $1 as not being that big of a deal to buy... since I recognize that in myself, I don't let myself buy (hardly) anything from the dollar bins at the front of Target and in the checkout aisle of Joann's (hmm, I'm guessing they realized other people think like me) and thus don't buy a lot of super cheap things I super didn't need. 

d.) Go through your own stash.  Chances are, you probably have something that will work.  I happen to have a stash of fabric right now so I don't really need to buy any. I've seen some advice for those who end up with overflowing stashes of yarn, scrapbooking, sewing supplies, and clothes: if you haven't used it in a year, toss it.  You probably won't use it.  I feel like this applies to the hardcore crafters who consistently use their stashes.  Most people I know only sew a couple times a year or knit/crochet a few scarves, but they shouldn't get rid of all their needles and stuff.  I think more useful advice for the occasional crafter who finds that life takes up more of their time than crafting is to have a predefined storage space for your crafts and then stick to it.  Maybe it's a wardrobe, a set of shelves, a closet, or even a small room with cabinets, whatever is appropriate to your craft/house-size/average stash/frequency of crafting.  If your stuff doesn't fit, then you have a problem.  The answer is not another set of shelves, it's going through what you have and slimming down your craft diet.

e.) You get what you pay for.  I just bought some sheets and pillowcases at a thrift store.  It cost less than $5.  If I had bought them new, the sheets alone would have cost around $50.  Even at a closeouts/seconds store, it still would have been in the neighborhood of $30.  My thrift store sheets don't match each other and one has a hole I patched, but I'm ok with that.  The amount I saved more than makes up for that small detail at this point in my life. 

f.) Lower your expectations.  While it's not incredibly rare to find things new in box, don't count on it.  Things will generally be used, it's more a question of how used/damaged are they.  Also, raise your expectations: just because it's cheap doesn't mean it's what you want/need.  Factor in how much it might cost to repair the item in the sale price.

3.)  Crafts must have a purpose (especially if I want to spend money on it.)  I tend to give practical gifts and make practical things.  There are some things that should not be knit (I'm looking at you, human hair doily).  I think amigurumi is adorable and I really want to make all of these, but I'm not going to buy all the colors of yarn I need to do so.  If I happen to already own some Tardis blue yarn, found a free pattern, and have several hours, I might make a dishcloth of a Tardis that has no practical purpose- but it's outweighed by the alternasponges and other practical cleaning supplies I needed and made.

4.) Use coupons.  If you know you're going to be working on a project and you know everything you need, start buying your supplies a month or two before you need them and make use of every 40% coupon you can find.  Joann's, Michael's, Craft Warehouse, Fabric Depot, whatever is in your area or stocks what you need probably has coupons that you can get in the newspaper or pick up in-store (I do the latter as we don't get a paper).  However, if you don't have a project in mind, don't wait to use them for something "more expensive." I've wasted so many coupons that way.  Pay attention to what types of things have regular sales.  I know that Joann's has a sale at least once a year where patterns are $1-$3 (next week in fact!).  The notions wall is often 50% off.  Their fabric rotates what type is on sale for 40%-50% off about every week.  So, if you can, just wait a week and check the ads. 


*technically, I have a very short term contract job at the moment and it has prevented me from making anything for today's post.  Thus no pretty pictures. 

Tuesday, September 13, 2011

Gehäkelter Topflappen

Growing up, we had these pot holders.  They were obviously homemade and probably by one of my grandmothers.  They were out of place in our pot holder drawer.  Our other pot holders were fabric sets (small, medium, large!), holiday themed (nothing says Christmas like Santa holding the green beans!), or some classy, modern looking woven blue braid wound into a pot holder (think classy Amish).  These were crocheted in 70's/80's bold colors, crazy thick, and I've never been sure if I really liked them or really disliked them.  Also, they confused the heck out of me.

these are not the ones I grew up with.  image from ravelry user mettetation

Saturday, August 27, 2011

More Alterna-sponges and Bread Failures

I found this link last week and it simultaneously makes me laugh and think its silly... and want to make one.  Apparently the UK has a chicken rescue organization and they often get hens without enough feathers... so they're asking knitters to make them sweaters.  Sweaters.  For chickens.
hen jumpers


Two updates on the alterna-sponge project (I've made about six now).  My mom read my post and was confused at what I meant by crocheting in the round. Here's a post of what knitting in the round does on this particular piece: two layers!  If it wasn't joined at the bottom, it could make a sleeve or a coffee cozy.  For this purpose, it's closed at the bottom and the last row closes it up at the top. 
round and round the crocheting goes!

When I was researching knitted/crocheted sponges, I saw a suggestion to put some bits or ends of soaps in a pouch like this and then you have a washcloth that is pre-soaped.  I wasn't a fan of that, but I did like the idea of putting half a sponge in it to add a bit of bulk.  I chose a green scrubber because a.) it's cheap, b.) half of it fits inside these just about perfectly, and c.) it doesn't hold on to water like the cotton so I don't have to worry about having a sponge that will never dry out (though it does take a while for these guys to dry).

alterna-sponge!
Oh and I checked: washing it with the sponge inside is fine.


So I haven't been posting about baking as much on this blog, but not necessarily because I'm not doing it.  Jamie and I have been baking bread out of his book Bread Alone lately because it really is cheaper than buying bread (it just takes a lot of time).  We have a starter and it's actually doing better than the starter we had in San Francisco.  Who knew?!  I think that while San Francisco has much better free yeast in the air (thus the amazing-ness of Boudin Bakery and true San Francisco sourdough), his house was always really cold and our starter was never at the right temperature to really be good.  I made the bread this past week and I basically made long hockey pucks. We've been having trouble with this particular recipe clearly the sides of the bowl as we mix it (in the kitchen aid because my arms are weak) so I kept putting flour in... bad idea.  According to pretty much all baking books ever, it was a good idea to add flour, but I added too much. I think that my problem was that the mixer was at least 1 speed too slow.  So no pictures of that.  Two slices, which are about the size of one biscotti, will just about fill me up for lunch.  It's bad. 

when husbands cook...
I am using my swiffer wetjet a lot though!

Friday, August 19, 2011

Alterna-sponge

I need more sponges. My husband and I have been looking at our budget lately and are looking to decrease our cost of disposable things like sponges. I was thinking I could make the standard swatch-sized washcloth for us to use, but I wasn't excited about it. One of my grandmas made a few basic knitted washclothes for us many years ago and a couple years later, they were faded and stretched out. I'm assuming some regular acrylic yarn was used for those (I haven't touched them in years), so I knew if I made some, I would use my cotton yarn for it's durability and ability to snap back to its original size after washing (well, mostly. Everyone has those cotton shirts that stretched out). I knew I wanted something with a bit of substance (not stretchy like garter stitch or even a stockinette)

Then I did a quick google/etsy search for knit/crochet sponges and I found these. Amazing. Pretty much as soon as I found the pattern, I sat down and made it. Didn't take long and I can't wait to actually use it! It's a bit like an alternative sponge- it's nice a thick because it is knitted in the round and so double thick. Just what I wanted.


KNITTED SPONGE

I also found another one that I wanted to try as well. I'm mostly done with it, but I'm considering frogging the whole thing to make another one of the alterna-sponges. It's a great knit and I love the treble instead of double crochet to give it bit more prominent nubbins, but I've gotten used to sponges. This is just too thin for my purpose: washing dishes. I want something a bit more substantial.

Monday, April 7, 2008

cell phone cover- now with plastic! (crochet)

first off, I HATE ipod socks and cell phone socks and find them pointless to knit/crochet or buy. (I do, however, regularly get teased for using a real sock for my camera... it's convenient and very un-bulky when placed in a purse).

SO, I got a new cell phone and free case and realized that even though the cell phone cover was manufacture made for the phone and and very nice leather, it had some things that I hate. First, it had a belt clip. I honestly don't know of a chick that uses a belt clip. Second, it didn't cover the entire keypad. Have you ever seen the oil and gunk that comes off your face and cakes on cell phone covers as you cradle it on your shoulder? yuck. it's worse if there is makeup involved. So I definitely wanted full keypad protection. I couldn't find any templates, suggestions, or even the hint that this has been done before (though I'm sure it has) so i decided to fake knowing what I was doing try. Stich 'n' Bitch: The Happy Hooker had a pattern for an ipod cover with a plastic screen protector (another thing i haven't seen online) so I decided to take that idea and roll with it.

What follows is a general idea of how to craft something for your cell phone (they're all different, a real pattern probably wouldn't help anyways) and what worked for me.


NEEDED
- medium-small crochet hook (I used F, it was the smallest I had at the time. Just got a D, I might attempt another with that)
- yarn, preferably cotton or a cotton blend (I used Lion Brand Cotton Ease which is 50/50 cotton acrylic)
- tapestry needle
- thin plastic (no idea where my mom got this, but it works great)
- paper/pencil/scissors (to make a pattern for the plastic)
- nail or awl (to punch holes in the plastic)
- hammer
- snaps or velcro or buttons. basically, some sort of detachable attacher to join the two pieces when they are on the device (i used Dritz Gripper Brand Snap Fasteners for thinner fabrics, size 15 (10mm). They're pretty old- my mom's kind of a packrat of sewing stuff- and something for a thicker fabric probably would have been more appropriate, but it works.) Velcro would work, so would buttons. I was just mimicking what the leather ones have.


FIRST
paper, pencil, scissors, and the cell phone. figure out where you seen to be able to see the actual phone and not yarn: that means the keypad, display screen, and if you have a front display, that too. Your phone does not made to close with yarn in it, so the template needs to account for that and be cut slightly bigger than the actual dimensions. This allows for the holes to be punched along the edge and the yarn attached about where it closes. Draw (trace if you can) on paper, cut it out and see where it needs to be smaller/bigger.


SECOND
awl or nail, hammer. When you're satisfied with the paper cut-out, trace/cut it out in plastic. I highly suggest paperclips to keep the two together. Clear plastic is hard to see. Also, I suggest drawing a border on the paper where you want the holes to go and using the paperclips to keep it all together while you punch. Oh, and think about where you want to punch. try making a swatch of your crocheting and seeing how far apart the holes would need to be. closer is better, particularly on the corners, BUT not too close because you don't want them running together or getting too close to the edge. I suggestion extra plastic for practice. No holes in the bottom of the display and top of the keypad piece! no yarn will be there!!
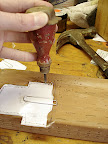
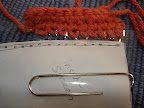

THIRD
yarn time. Now, cast on to the plastic. I started with the front cover piece because it seemed easiest. Of the 3 pieces, it was. I cut off a piece of yarn about 3x the size of the area I was casting around and used a tapestry needle to poke it through each hole because my hook wouldn't fit. For some reason I couldn't figure out how to do this with the same yarn i was crocheting with.... see the picture. When I was just short of the edge of the cover, I bound off. Then, I cast on to the plastic display piece and used the tail to bind it to the front display piece. Keep the cell phone handy and try it on a lot. I had to take a row off. The goal is snug.
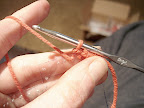


FOUR
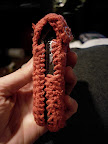
more yarn. This time the keypad piece. I cast on one row and then decided to go across the row instead of trying to figure out how to do some sort of circle. I know it's probably possible, but this way seemed simpler. I also did not join it at the bottom so as to leave room for my charger without taking off the entire cover. Then I wove things in (which I hate doing) and took pictures.
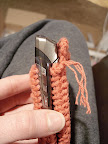

FIFTH
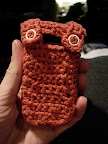
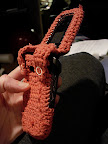
the flaps. They kind of look like overalls to me. tiny, pink overalls. They are simply a rows of four sc. I like the placement of them because they protect my corners. I drop my phone. a lot. In fact, I have what one might call butterfingers. anyways, a few rows of those, leave room so that you can put a snap backing in the bottom piece and snap piece on the flap. Ok, this might seem sort of silly... but you can't crochet these two pieces together. I'm sorry, it would look a lot cleaner, but if you join the two pieces, you'll never get the thing off your cell phone without destroying it. not cool. Your battery (and in my case, also my sd card slot is under the battery cover next to the battery) is there and if you need to clean it or something, you want to be able to remove it. Oh, if you plan on buttons, now would be the time to make button holes

SIX
the detachable attachers. Velro or buttons or snaps... all good. my snaps had directions with them involving placing the pokey thing in the back piece and poking it through the fabric and hammering in the male or female part, then matching where that is on the flap, placing the pokey thing and hammering the corresponding part.


Done. :-)