Monday, August 13, 2012

From College Cubes to Wire Shelves

It's been a while since I last posted.  In early April, I got a second part time job in my field– graphic design.  So, I cut back my hours at UPS Store job to 2 days a week with the occasional Saturday and started working an 8-5 job 3 days a week. 

Usually those Saturdays are spread out and I don't mind working them even though it means a one day weekend.  However, it's August and everyone is moving and I ended up taking someone else's Saturday shift along with my own.  After three weeks of working 6 days a week, this normal two day weekend feels amazing.  

So what's been happening?  Well, it's summer now.  My law student husband had an internship in Germany for 7 weeks. (Oh and did I mention this is the first summer I've ever not had a vacation or break from work/school??)  He's back now and starting school soon, but that was really rough on me.

I've been busy.  I still work on knitting, baking, crafting, etc but usually don't have time to photograph them or post (even this post has taken me most of an afternoon!). Hopefully I can get back on some sort of schedule—or at least do some mass writing and post date them so it appears I'm on a schedule!

---------------

Everybody dislikes something about their house.  I dislike many things in my house.  Case in point: the master bathroom.  It's about 3 feet wide.  My feet touch the wall when I sit at the toilet.  The only storage space provided was an ill-fitting medicine cabinet and likely because it was there when the landlord began fixing up the house - if he did not bother to install any sort of towel racks or toilet paper holders, I can't imagine that a medicine cabinet was a priority.  When we moved in last year, we put some of my old college modular cube storage in there because we had it and needed something to put our toiletries on in the bathroom.  I was against this from the beginning.  The cubes are ill-fitting in that space and not very usable.  However, it was what we had. 

Fast forward to this April.  Our lease was up and after negotiating with our landlord, we were able to secure the same rate we were currently paying for the next two years. As much as we dislike certain things about our house and our landlord's management, it was worth it to us.  So the first project I tackled when I realized we were going to be here another two years was our bathroom.

The before.
A wee bit crowded- mostly my stuff.

When I was at the RE Store (a Habitat for Humanity store full of all sorts of fun building type stuff), I found an 84" piece shelving wire looking lonely and tall in a corner.  Wouldn't you know, it would fit perfectly in my little corner space if I cut it in half!*  I took it home and then gathered the appropriate hardware from a big box store to connect it to my wall. And also a hack saw.** 

While the husband was studying hard for exams, I got all handy and cut/installed the shelf. 

I actually really like the white on cream look.
I chose to install the top shelf slightly high because I wanted it to double as a make up shelf.  I'm blind without my glasses. They are useful when applying stuff to your face, so it helps to have a mirror about two inches away from eyes. Leaning over a sink that has a high likelihood of getting my shirt wet because the faucet sprays too hard and soaks the entire tiny counter space is not ideal. I put down a clear shelf liner from the modular cubes in two places. One so our toothbrush chargers won't fall through and the second I have a small place to put the earrings/necklaces I wear too much to have a permanent "away" place.   

much better!


I also found a glass jar with lid (possibly used to have a candle in it?) at a thrift store to put my cotton balls in.  It makes me feel like I have a fancy, organized vanity space.  I looked for a while for an equally nice looking glass jar to put q-tips in, but eventually gave up. A salsa jar ended up being the perfect size.  At some point, I'll get around to painting the lid.*** I'm pretty sure all q-tips are "mild" and I don't need to be reminded.


* Technically, due to the stellar construction of my house, it only fits perfectly at the back near the wall.  It widens out about .5" by the front of the shelf. 

** Young married people have no basic tools.  Next time you are invited to a wedding and forgot to buy a present, consider dropping by a Big Box hardware store and picking up a gift card.  It will get used eventually.  They have no idea what they need right now.  

*** Honestly, it'll probably be a couple of years if it ever gets done.  I have very realistic expectations from some projects.  

Thursday, March 15, 2012

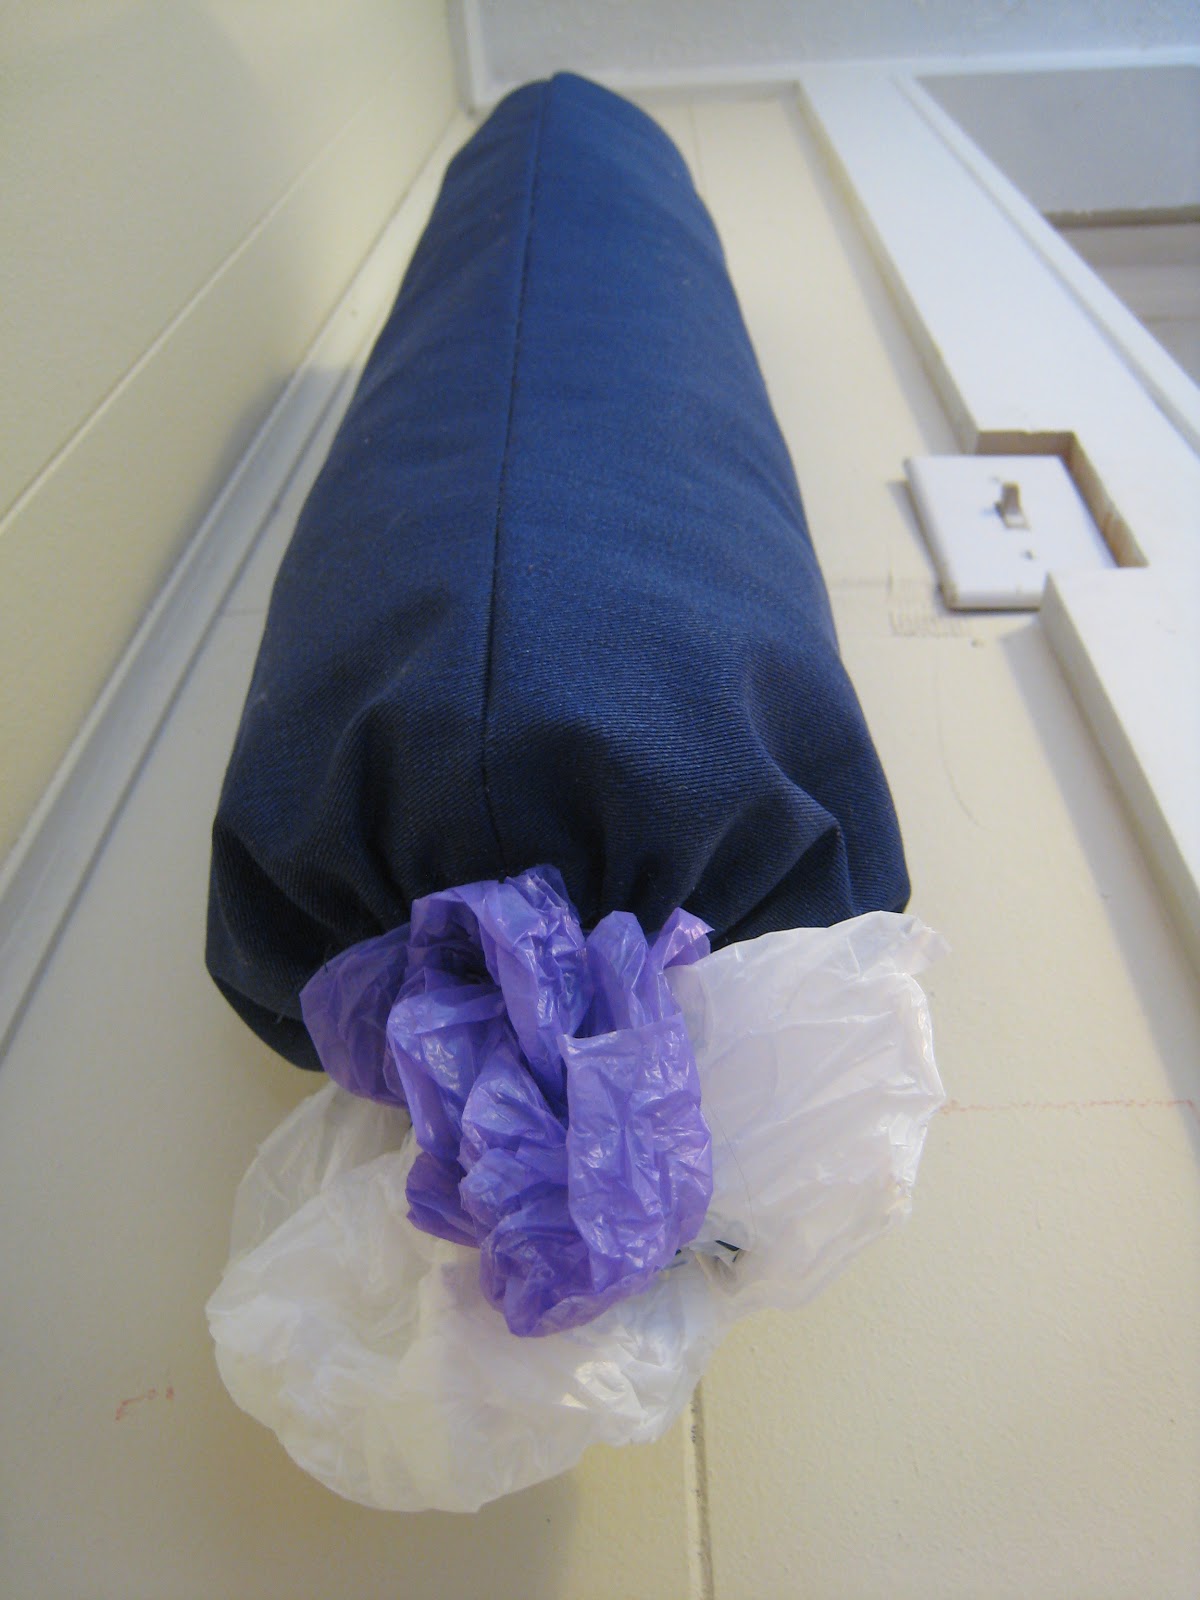
Plastic Bag Holder

Our plastic bag situation was getting out of control.  While I am highly in favor of reusable grocery bags, it's very handy to have a stash of bags around for walking the dog and garbage bags.  Also, I forget them in my car a lot.  However, a reasonable sized stash of bags has ways of taking over spaces.  I've done some crafts with plastics before: plarn baskets, pot scrubbies, and even some full on purses with plarn (eeks!  Must get a picture!) but I've never made anything to control the stash.  I once posted on my college message board that I was looking for plastic bags and ended up going to an apartment that had dedicated the entire area under their sink plus a few other cabinets to plastic bags.  They were trying to be responsible and not throw it away, but they clearly needed to stop collecting bags.  My mom used an old cardboard container, an old roommate bought a plastic ikea contraption, and until a few weeks ago, we were using a wicker basket.

The basket had issues.  Namely, it didn't fit well near the door and bags tended to float out of it when it got too full.  I thought about buying something, but since I have free fabric, why not use it?

bags easily come out the elastic bottom
I used The Accidental Crafter as my technique guide for properly casing the drawstring and elastic and wound up with something that matches the cover I made for the dog bed, pops on my white/cream walls, and fits perfectly in narrow space by the door.

drawstring doubles as a way to hang it to the wall. 

The drawstring top allows us to periodically add bags to the holder easily and the elastic bottom allows us to draw out single bags as needed when headed out the door when an excited pup in tow.

Were I to do it again, I would reposition where the drawstring comes out because I have a prominent seam right in front that I am not a fan of looking at all the time.  Alternately, I could add a ribbon/band between the seams so that the seams are on the side instead of lazily using my drawstring as the hanger.  Also, I would loosen the elastic at the bottom to a size I could more easily fit my wrist in to grab bags that are stubbornly not falling to the bottom.  It works as is, but one of these days I'm probably going to get annoyed and fix that. 

awkward narrow space + tall, narrow bag holder = awesome

Thursday, March 8, 2012

Baked Pizza Pockets and Veggie Sweet Potato Burgers

I know the "about me" on my blog says it's to keep me busy while underemployed, but I have been BUSY lately.  Underemployed really refers to the type of job and minimum wage I'm earning despite having a bachelor's degree, not the hours I work.  My paychecks are pitiful despite working a decent amount of hours, so I've been doing some freelance graphic design work to supplement my income.  My house and this blog are suffering due to my lack of free time.  I'm slowly making progress on a few projects, I just haven't had time to write up anything about them!

In the last few days, we tried the pizza pockets from the last post.  They were delicious!  We have plans to pick up more pizza dough and make more.  Yum.  They don't brown very well on top, I think a bit of olive oil or an egg wash just before popping them in the oven would fix that though. 

I also made this Veggie Sweet Potato Burger the other day.  I halved the recipe and spiced it with oregano, red pepper flakes, and and garlic.  It was delicious!  It reminded me of a hummus made with sweet potato - which isn't surprising since tahini is one of the major flavors in the burger and I topped my burger with spinach, tomato, and cucumber, just like I would for a hummus wrap.  Half a recipe made four giant burgers so we'll get to enjoy it again in a few days.  I believe due to my use of garlic in it, it is not doggie-scrap safe, which is unfortunate because our Puppy was super excited when we made it.  I think she likes sweet potatoes.

Here's a sneak peek into a project we're currently working on.  It's taking a while to finish because the weather isn't always cooperating when I have time off to work on it. I'm hoping it'll be functionally finished this weekend though.

project supplies from a big box store

Tuesday, February 21, 2012

Frozen Pizza Pockets

My husband has a weakness for cheap frozen food.  He loves cheap frozen taquitos and burritos.  I have a problem buying them because I flip over and look at the ingredients- the salt is way too high and the serving size way too small.  There's no way he'd only eat five taquitos or one small burrito, he'd easily eat twice that.  What to do??  Well, I had some left over pizza dough so I decided to make pizza pockets.

There was a BOGO sale on pizza dough the other day. One was used immediately for a spinach, turkey sausage, onion, and pepper pizza on an olive oil base and the other sat waiting for inspiration.  My first thought was to do rolls stuffed with pepperoni and pepper jack cheese (a West Virginian specialty according to my freshman year roommate), but nixed it because I didn't have pepperoni or pepper jack.  Then I realized I could make pizza pockets using ingredients on hand from the pizza the night before and some frozen pizza sauce from a couple months ago.

ingredients set up
After defrosting the sauce, I set up my ingredients:

- Turkey sausage
- mozzarella (we buy balls, not shredded)
- pizza sauce (homemade and seasoned with oregano, garlic, and basil)

- parmesan (optional, but it was in the fridge!)
- red pepper flakes (optional)


Basically, any combination of ingredients you'd put on a pizza would work.  I gently rolled the dough into a log and divided it into roughly equal pieces.  Taking one piece at a time, I gently stretched it into a round(ish) shape like I would for a large pizza.  Take your time, dough is fragile.

I spread about a teaspoon of sauce over the entire dough ball and over half put 5-6 pieces of sausage, roughly the same amount of mozzarella, a tiny bit of parmesan, and a dash of red pepper flacks.  
pizza pocket assembled
Then I folded half the dough over to form a pocket.  Look, a tiny calzone!  I use a fork to seal the edges and tried my best to not seal them too flat because I didn't want them to burn when I eventually cook them.  I froze them individually on a baking sheet so they wouldn't stick together and put them in vacuum bags after they were frozen in portions of 2 (for one person) or 4 (if we're both snacky).
pizza pockets frozen
According to a recipe I read, bake them at 400 for about 30 minutes frozen or 20 minutes defrosted.  I haven't actually cooked these yet so I don't know if that cooking time is accurate and I'll have to keep my eye on it. I'm excited to eat these!

Tuesday, February 14, 2012

Dry weather, dry house

[1/14/12: apparently I forgot to press "publish" yesterday... oops!]

The weather is not cooporating.  I have a couple of projects in the works, but I need it to not be freezing and/or raining so I can sand and spray paint outside.  For another project, I am in the processing of finding/ordering an essential component and I'm stuck until I get it.

With the exception of today, the weather has been dry and with the heater running, bone dry in the house.  My nose has been quite distressed by this and protested with some bloody outbursts.  Since we don't own a humidifier (yet), we've been exploring the DIY options.

Option 1: leaving bowls of water in rooms to evaporate
Verdict: doesn't appear to help much, but I've left them out. Best if you have a baseboard heater.

Option 2: using a crock pot as a makeshift humidifier
Verdict: helps a little, but we're no longer using it because there is no "on" light. Someone decided to see if it was on, stuck their hand in very hot water, and burned themselves. 

Option 3: hanging up wet laundry or damp towels around the house
Verdict: best solution yet. Since we already hang dry our clothes, we just moved a drying rack into the bedroom.  Our jeans and other laundry are nearly bone dry by morning.  If you've ever tried to air dry jeans before, you know that's unusual.  It typically takes a good two days to air dry.

Option 4: be the humidifier and go around spraying water from a spray bottle everywhere
Verdict: works instantly, but only as long as you spray frequently.  Not a good solution if you want uninterrupted sleep. 

Option 5: simmer water on the stove
Verdict: works great, but quite localized to the kitchen.  I highly suggest doing this if the oven is on because that can further dry out a home.  Bonus points because you can add citrus peels, essential oils, or other spices/herbs to the water to make it smell delicious.

Option 6: bring plants inside
Verdict: undetermined, but my rosemary is now living next to my bed for the rest of winter.  The act of watering the plants will humidify the hair and plants recycle water by transpiration: moisture is released from the roots to pores on the bottom side of the leaves. If you're buying a plant instead of a humidifier, look for bamboo palms, snake plants, areca palms, spider plants peace lilies, and gerbera daisies. 

Option 7: shower with the door open
Verdict: works, but a short term benefit. 

Option 8: make a humidifier from scratch
Verdict: haven't tried it.  We'll cave and buy one as soon as we find one in our price range that cleans easily.  


Thursday, February 9, 2012

Homemade Turkey Sausage

Remember that giant turkey we got on sale after Christmas? Well, one thing we've really enjoyed making from the ground turkey is turkey sausage.  For almost every package we open, part of it becomes sausage: on pizza, in pasta sauce, with eggs, etc. We have yet to find sausage casings to make proper tubular sausage (though we have a stuffer attachment for the Kitchenaid!), so most end up being patties or tiny meat balls.  Jamie and I have both been to Germany and realize there are a bajillion types of sausage depending on the meat, spices/herbs and prep method, but we've seasoned it simply: sage.  It is AMAZING how much that one little herb changes the somewhat bland flavor of plain turkey into sausage.

By the way, it is coincidental that "sage" is the final syllable of sausage.  Sausage is derived from "salsicus" (salt) in Latin.  

So how do we make turkey into sausage?  First, chop up some fresh sage and add it to a bowl of ground turkey. I estimate we use about a tablespoon or so per pound. Salt and pepper to taste.  Pinch off pieces to make little balls (hint: wet hands work best when working with raw meat).
forming the sausage
Next: saute over medium heat in olive oil.  Baking would probably work as well, but we've always been too impatient to get dinner on the table. 
sauteing the sausage
Then use in your favorite recipe.
Mushroom and turkey sausage pizza with asparagus
Easy peasy.   We love it.

Tuesday, February 7, 2012

Energy Trail Mix

This happens to me often: I'm headed out the door and realize I need to eat something fast, otherwise I won't make it til my next regularly scheduled meal (which means getting fast food or convenience snacks to tide me over, which is both unhealthy and expensive).  Unfortunately, we don't have a lot of snacks that be carried out the door (yogurt can be messy).  So, I decided to mix up a high energy, good source of protein snack.  I could have just bought some trail mix from the store, but most of them had something in it I didn't want (i.e. brazil nuts, etc).  I feel like this was just as cheap and I could choose exactly what I wanted in it.

almonds, cashews, cranberries, golden raisins

Recipe
1 lb almonds
1 lb cashews
2 c. cranberries (or to taste)
2 c. golden raisin (or to taste)

Mix together in large bowl.  Keep in airtight container.  Servings size: 1/4 c. (about a handful)


I already had the cranberries on hand in a Costco sized quantity and we had the golden raisins left over from my husband's Christmas pudding (which I totally meant to post a picture/recipe of, but forgot til it was nearly gone).  I don't use golden raisins much, so I figured this would be a good way to use them up before they got all dried out.  Yes, I realize raisins are dried out, but there is a difference between fresh, plump raisins and old, dried out raisins.

By the way, I ended up keeping the trail mix in an old tupperware 1qt pitcher with a push button lid, but this canning jar was waaay more photogenic.  A ziploc back would have worked well, but I've noticed that if a bag/container cannot be closed with one hand (because the other is full of snacks), it won't get closed in this house. Then I wander through the kitchen a few hours later wondering why the chip bag is open.  Or if the cereal has been opened all day or was an afternoon snack. We're probably going to be using that tupperware as a snack container more often.