
 |
| these are not the ones I grew up with. image from ravelry user mettetation |
See, they were thick because there were two layers. But some of it wasn't two layers. I could pull the middle circles apart, but not the "fingers," and the edging was clearly only one layer. What was this madness? So when I saw this pattern on Ravelry* I knew I had to make it, confused feelings of whether or not I found the pattern attractive or not aside.
Problem. It's in German. Now, I lived in Germany for 3 months, my only useful crochet hook is one I bought there, and I can speak conversational German, but I know no German crochet terms. Luckily, the first 8 or so rows aren't really difficult and all I needed was a quick translation that we were doing double crochet to knock that part out. The rest? Not really sure what it's trying to say. I think it's describing the edging process. Apparently directly translating patterns like that, unless you're the publisher, is not allowed by copyright laws (and Germany had some pretty strict copyright laws). Even if you're just trying to make the darn thing and help others make the darn thing. So the internets couldn't help me either.
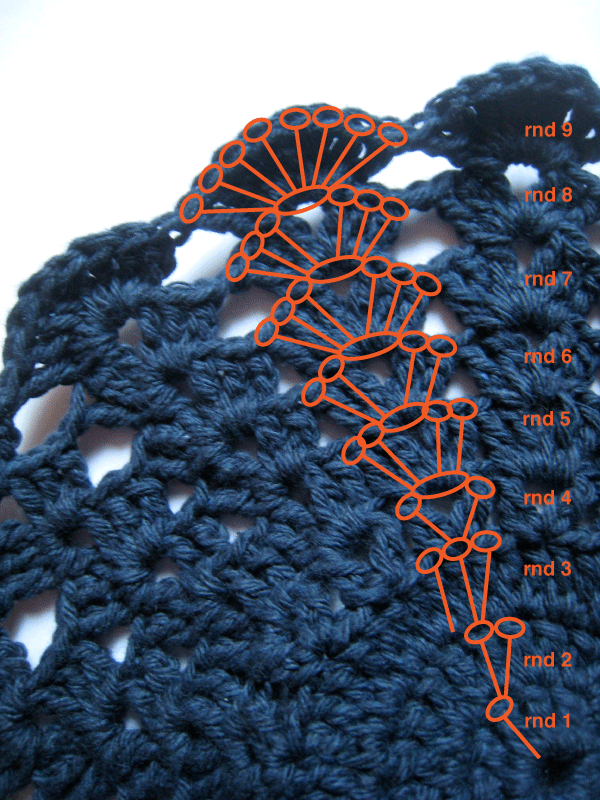
Since I can't translate what I did directly, I'm going to talk about the theory of how this was made and use a diagram/picture of it as my example. In my diagram, each oval with a leg is a double crochet, each plain oval is a single crochet. I only drew out the repeat (meaning on rnd 4, there are two skipped stitches in a row).
First the base: The first row is a multiple of three, the second row doubles itself, the third row doubles that. If you started with three double crochets in a round (which is about impossible) the second row would have six stitches and the third row would have twelve stitches. Middle done.
The rest of it is basically a broken shell pattern. The fourth round is where things get interesting. If you observe, round three has three crochets upon which to start our pattern (hence the first round had to be a multiple of three). Round four started in the middle crochet and because of the double crochet-single crochet-double crochet, forms a triangle- and look, it came from one crochet, but made three for the next round to base it's repeat off of. That round ends up looking like really cool equilateral triangles all the way around.** It doesn't seem like it, but that's where the shell pattern starts. It's a two leg shell with a single crochet breaking it up. That single crochet that breaks up the shell is the base of the shell on top of it. Rounds five and six are where it becomes more apparent: they are four leg shells with a single crochet in the middle of them. Rounds seven and eight are six leg crochets (round eight having a tension modifier of a single crochet linking the shells) and round nine is a full eight leg shell with no single crochets. That was really wordy and confusing, but it's my way of getting around the translation issues.
 |
| broken shell diagram |
 |
| see? two layers! super thick. |
The contrasting color is slip stitched anywhere around this thing and worked as *single crochet-chain 1* around each petal. It was a bit confusing trying to go down and up the petal, but I figured it out. The chain 1 really helps bridging those large gaps between rounds. Oh, and a final round of single crochet just around the perimeter of the pot holder helps balance the outer edge against the thickness of the two rows going in and out of the petal (compare this photo to the last one).
 |
| this photo is try to take photos in morning light near my kitchen window. |
So I'm still not entirely sure if I like this type of pot holder - it's folk/hippy-ish which I like, but it's not very chic or modern. Also, it's GIANT. I think my biggest pot will fit comfortably on it. My husband said I should make one that looks like a sunflower. I think any more I make I'd take out one of the center rounds to shrink the diameter, which would also create fewer petals.
 |
| most accurate colors yet! Hooray for good lighting! |
*The link I listed does not go to Ravelry because I think you can only access the patterns if you're a member. However, Ravelry only shows a picture and points you to the site I listed for the pattern. PS: If you knit or crochet, you absolutely should join Ravelry! It's a great resource to take stock of your stash, your needles/hooks, find free (and not-free) patterns, and document what you've made. Whenever I want to crochet/knit something, I go to Ravelry for inspiration and patterns.
** From round four until the edging is done, the whole thing looks like there's no way it's going to be a flat circle again. Take heart! It will be. The tension from the edging sets everything right. I read a few comments of people making versions of these that edited the pattern to make it lie flat, but from the pictures I think once they put the edging on, it curled up. So I suggest not doing that.
1 comment:
Just like the ones we grew up with (only more modern colors).
Post a Comment